
An AI manhua character turnaround shows the same character from the front, side, and back. Its purpose is to explain a design across changing camera angles. Align overall height and proportions first, then inspect hair, clothing construction, and asymmetric props. Three appealing pictures are not a reliable turnaround if they disagree about the design.
This guide uses Lin Lan, an original investigator with a dark bob, teal cropped jacket, ivory shirt, charcoal trousers, and a brown crossbody bag. The methods are production suggestions rather than measured model performance. A generated turnaround is a visual reference, not a rigged character, a video asset, or a geometrically precise modeling blueprint.
AI manhua character turnaround: what it must explain
A mood illustration can prioritize lighting and personality. A turnaround should reduce distractions so collaborators can inspect structure. It answers questions such as: how does the side profile relate to the front face, what happens to the haircut at the back, and where does the strap travel around the torso?
Let the story determine the reference scope. A series of front-facing portraits may not need an elaborate full-body board immediately. A chase with rear views and turning shots benefits from resolving back clothing and hair before those panels enter production.
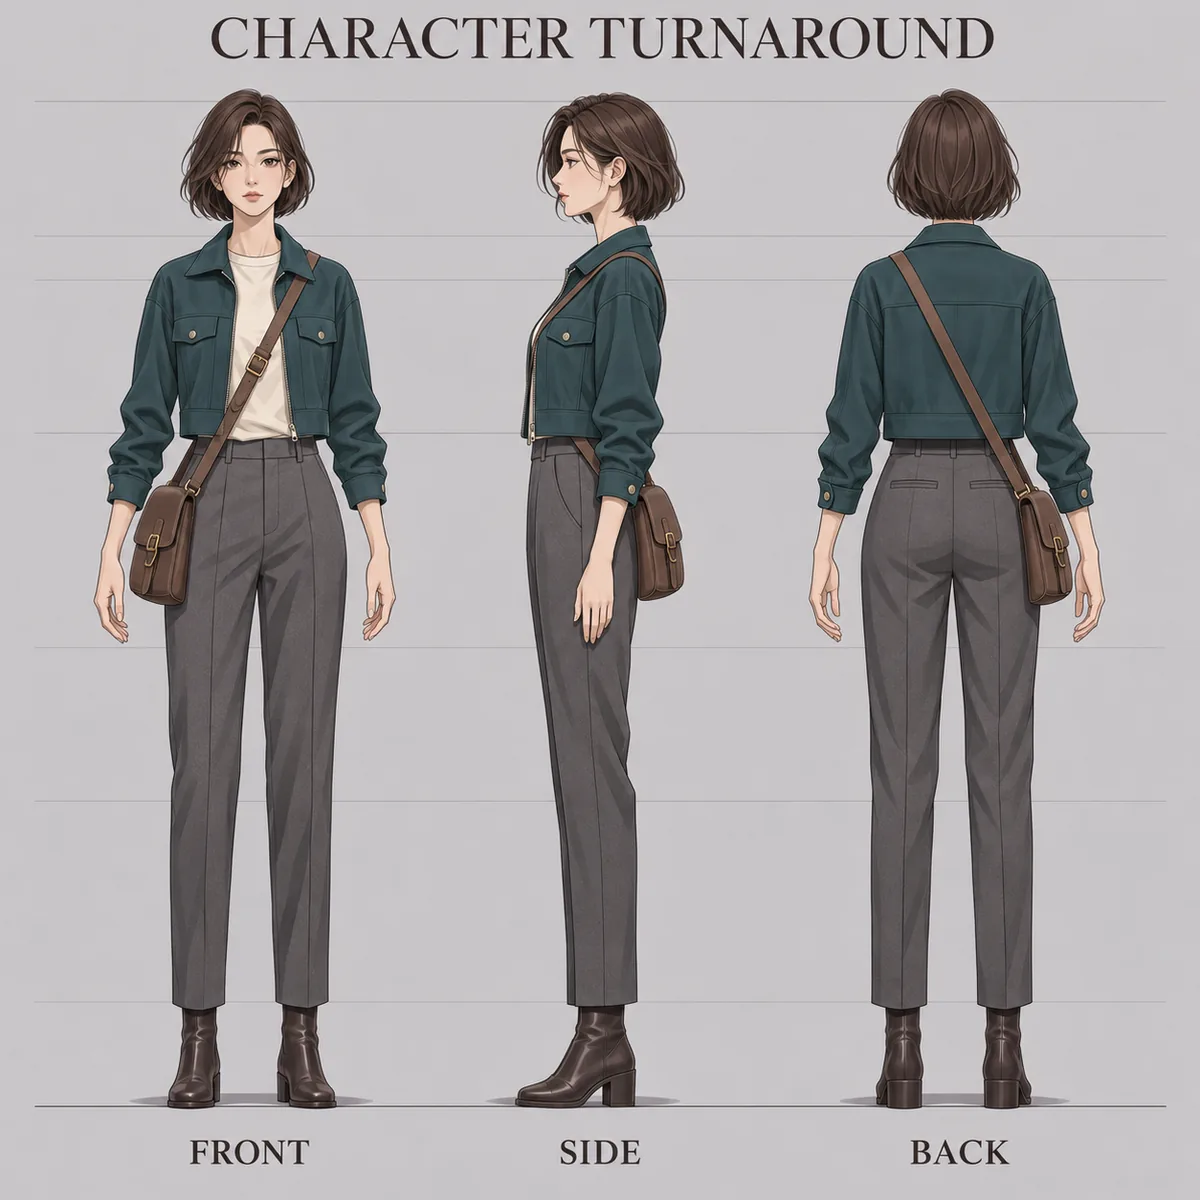
AI-generated teaching illustration: compare shared proportions before checking clothing details; this is not a precision engineering reference.
1. Approve a complete master reference
Choose a full-body image with a clear face, readable hair, visible shoes, and unobstructed clothing edges. If the original crops out the feet, decide on the footwear before making the side and back. Otherwise each new view can invent a different solution to information the reference never contained.
Write down design decisions that the front image cannot show. Specify the back hair silhouette, jacket length, whether the back has a graphic, and how the bag attaches. An undefined rear design is a gap in the brief, not automatically a failure to reproduce the character.
If the base design is still changing, follow the character design workflow first. A turnaround built around an unapproved face or outfit will need to be revised whenever those basic decisions move.
2. Specify view direction and stance explicitly
“Left profile” can be ambiguous. It may describe the direction the face points or the side of the body visible to the viewer. State both. For example, “the character faces screen left, showing her anatomical right side.” Check the output against that agreement rather than relying on the label alone.
Task: Create a three-view reference of the supplied original character.
Identity: Adult investigator Lin Lan, chin-length dark brown bob,
teal cropped jacket, ivory crew-neck shirt, charcoal straight trousers,
dark ankle boots, brown crossbody bag.
Prop rule: Strap over her left shoulder; bag at her right hip.
Views from left to right: Front, right-side profile, back.
Profile direction: Face toward screen left, showing her own right side.
Stance: Upright, feet grounded, arms slightly separated from the torso.
Layout: Three complete bodies at the same scale and foot baseline.
Treatment: Pale gray background, even light, weak perspective,
clear 2D reference drawing.
Avoid: Action poses, low camera angles, dramatic shadows, extra people.
These instructions define the target; they do not guarantee geometric accuracy. If a combined request confuses the views, make and review each angle separately before arranging the board. Separate generation also creates opportunities for drift, so keep checking against the approved master.
3. Align large proportions before small details
Compare the views at a common height. Inspect the feet and top of the head, then the chin, shoulders, waist, knees, and jacket hem. When one view looks taller, first rule out a layout-scale difference. If local landmarks still disagree after uniform scaling, the structure needs correction.
| Landmark | Question | Correction |
|---|---|---|
| Head and feet | Do all views share a scale and baseline? | Resolve layout differences first |
| Chin and shoulders | Is head size and neck length comparable? | Repair the local proportions |
| Jacket hem | Does it end at the same body level? | Specify the intended garment length |
| Bag and strap | Can you trace the attachments around the body? | Check anatomical sides and occlusion |
| Back hair | Do length and volume follow the front design? | Add missing rear-design information |
Avoid stretching a view non-uniformly just to make guide lines meet. That can align the head while distorting the face, hands, and clothing. Alignment guides are diagnostic aids. Their value is in revealing an inconsistency, not making a board appear mechanically tidy.
After fixing a major proportion, recheck the nearby features. Lengthening a torso can move the bag, change the jacket-to-trouser relationship, or alter the apparent arm length. Corrections should preserve the design as a whole, rather than satisfying one isolated measurement.
4. Audit asymmetric details separately
Lin Lan's strap runs over her left shoulder, with the bag at her right hip. In a front view, the character's left is opposite the viewer's left. In a back view, the relationship changes. A rule such as “put the bag on the left of every image” therefore creates a contradiction.
Use the same audit for scars, badges, single earrings, holsters, and a character's dominant hand. A side view can hide part of a prop behind an arm, so absence from the visible contour does not always mean the item has vanished. Trace the physical route before deciding what needs repair.
If an attachment remains unclear, add a specific detail image rather than accepting an impossible connection. Additional angles should solve a defined information gap. A coherent three-view board can be more useful than five views that disagree about clothing seams and prop placement.
5. Test the turnaround in an actual panel task
Choose one front, one side, and one rear story shot. Ask whether the board helps you produce or draw those shots with fewer unanswered design questions. If the face, jacket, or bag changes, use the consistency checklist to distinguish an identity issue from a clothing or camera issue.
Archive the board with its character version, view directions, master reference, and remaining corrections. Use the character template for the handoff. Keep unfinished tests marked as drafts so they do not become accidental production references.
Frequently asked questions
Must all three views be generated in one image?
No. One board makes overall comparison convenient, while separate views can make a specific correction easier. Choose the approach you can inspect and control. Both methods require identity, proportion, and prop checks before approval.
Does a manhua turnaround need a T-pose?
Not necessarily. A relaxed upright stance with arms slightly clear of the body often explains clothing for still-image work. If a downstream artist or rigging process requests a specific pose, follow that actual delivery specification rather than applying one universal pose rule.
Can I use the result directly for 3D modeling?
You can use it as visual guidance, but a modeler may need to resolve perspective errors, hidden shapes, and contradictory structures. For dimension-sensitive work, provide measurements and technical requirements separately. The word “orthographic” in a prompt does not establish precision.
Why does the back view invent a jacket graphic?
First check whether the brief defines the back as plain, seamed, or patterned, and whether reference textures invite a mistaken interpretation. Keep the garment wording stable. If you edit the back, inspect the collar, sleeves, and strap boundaries again afterward.
Start with one approved character in Character Studio, then add the views your next scenes need. A turnaround reduces uncertainty for the next production step; it does not replace review of the final panels.