
AI manhua character design works best when you establish a visual brief, approve one clear master reference, and test it in a few panels before making an episode. A beautiful portrait is useful, but a production reference must also explain the clothing, silhouette, and props that other shots need.
Here, “manhua drama” means a workflow that uses illustrated characters and panels to tell a dramatic story. This guide covers image preparation. It does not suggest that ArtImgAI produces video, voice acting, lip sync, or a finished edited episode.
Our original example is Lin Lan, a 24-year-old investigator looking for a missing cassette in an old city. She has a chin-length dark brown bob, a teal cropped jacket, an ivory shirt, charcoal trousers, and a brown crossbody bag. These are teaching examples rather than measured product results.
1. Start AI manhua character design with the shots
A character biography explains motivation. A visual brief explains what an image must show. “Secretive but kind” may help a writer, while “a guarded expression, slightly lowered outer brows, and a closed stance” gives an image maker something observable to work with. Keep both documents, but give each a different job.
List three likely shots before choosing decorative details: a conversational medium shot, a full-body street view, and a close-up looking over the shoulder. If most scenes are close conversations, prioritize the hair silhouette and neckline. If action plays out at a distance, a distinct jacket shape can be more useful than a tiny earring.
An effective test is to reduce the reference to the size of a phone panel. Can you still identify the character without a name label? If recognition depends entirely on a detail that disappears at that size, add a more visible identity cue before production grows around the design.
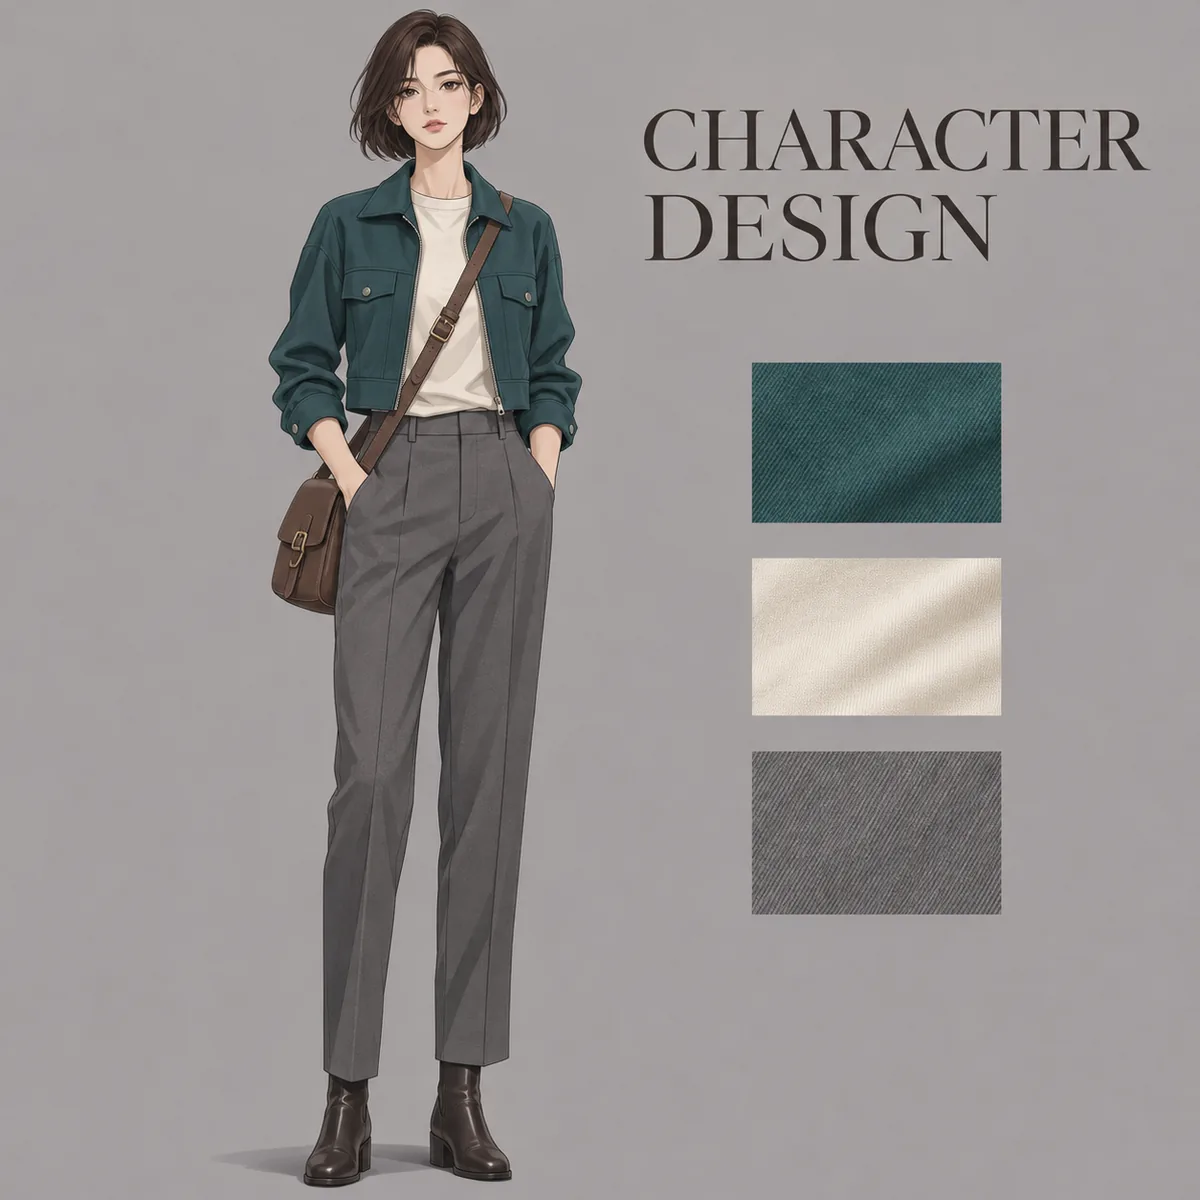
AI-generated teaching illustration: resolve the silhouette, clothing colors, and signature prop before adding a dramatic scene.
2. Separate identity anchors from shot variables
An identity anchor is a feature you intend to preserve. A shot variable is something the current panel is allowed to change. Writing them in separate blocks makes later corrections easier: you can replace “looking over her shoulder” without accidentally rewriting the character's face and clothing at the same time.
| Layer | Example agreement | Revision rule |
|---|---|---|
| Appearance | Adult woman, narrow face, chin-length brown bob | Keep stable after approval |
| Base outfit | Teal cropped jacket and ivory crew-neck shirt | Create a separate outfit version |
| Prop | Strap over her left shoulder, bag at her right hip | Specify the character's own left and right |
| Shot | Wary expression, medium framing, alley lighting | Change only what the panel requires |
Use the same color vocabulary throughout the brief. Alternating between teal, blue, and emerald invites different interpretations. Save a neutrally lit reference as the base color agreement; a blue night scene should not silently redefine the jacket for every subsequent scene.
3. Write a character reference prompt with one job
Use the Character Studio as a starting point for your first reference. The following prompt describes one character and one task. Its constraints express the desired result; they are not guarantees that a model will obey every instruction.
Task: Create one master character reference for an original manhua drama.
Character: Lin Lan, an adult woman aged 24, narrow face, chin-length
dark brown bob with inward-curving ends.
Outfit: Teal cropped jacket, ivory crew-neck shirt, charcoal straight
trousers, dark ankle boots.
Prop: Brown crossbody bag. Strap over her left shoulder, bag at her right hip.
Composition: One person, full body, relaxed front-facing standing pose.
Hands, neckline, and bag strap visible.
Treatment: Clear 2D character concept, readable contours, neutral even
lighting, pale gray background.
Avoid: Additional people, multiple views, story captions, and watermarks.
Do not combine a turnaround, an action scene, and an expression grid in the same first request. Those tasks ask for different compositions. Also avoid stacking incompatible art directions such as flat cel shading and detailed photographic skin unless that combination is an intentional experiment.
Reference inputs and editing controls vary by tool and selected model. Use only options available in the current interface. A written “avoid” block is not necessarily a dedicated negative-prompt field, and a stable seed should never be presented as proof of character identity.
4. Choose the usable reference, then archive it
Review candidates in two passes. First remove production obstacles: cropped feet, hidden hands, ambiguous clothing seams, an unreadable face, or a prop that merges with the body. Then compare expression and aesthetic quality. This prevents an attractive lighting effect from distracting you from a reference that cannot explain its own design.
A moody poster can remain a promotional asset without becoming the master. Your working reference should make the collar, sleeves, hem, and bag placement easy to inspect. If an accessory matters to the plot, include at least one view where it is not hidden by hair or a hand.
Store the approved image alongside the prompt, date, version, and any settings you can actually retrieve. A name such as lin-lan_base_v01_front.png is more useful than final-final-3.png. Keep rejected experiments outside the approved folder so that a collaborator cannot mistake a promising draft for the current standard.
5. Add only the supporting sheets the episode needs
Use a character turnaround to resolve the side profile, back hair shape, and jacket construction. Use an expression sheet when dialogue relies on subtle changes in emotion. These sheets answer separate questions and should refer back to the same approved identity.
Do not assume a multi-panel board is internally consistent just because its images share a page. Enlarge each panel and inspect the hairline, face width, cuffs, and strap direction. When panels conflict, correct the relevant view before treating the whole board as a future reference.
For a short first episode, a few reliable views are often easier to manage than an ambitious board containing every possible costume and pose. Expand the reference set when a real scene exposes a gap, and record what changed so earlier shots remain understandable.
6. Approve three test panels before scaling up
Produce a front medium shot, a three-quarter view, and a full-body long shot. Keep the identity block unchanged and add only the framing, expression, and environment for each panel. Use the approved reference where the chosen workflow accepts an image input.
Review identity separately from storytelling. The character may be recognizable while the acting is weak; the action may read clearly while the face has drifted. Label the failure before changing the prompt. If the profile is the problem, adding a side reference is more targeted than repeating “perfectly consistent” throughout every request.
If the character disappears in wide shots, strengthen a large silhouette or clothing cue. If only dark scenes fail, inspect lighting before changing the base colors. The character consistency guide explains this diagnostic approach in more detail.
Frequently asked questions
How long should an AI character design brief be?
Long enough to specify observable features and the current task. Keep narrative history in a separate document. An extra paragraph is useful if it clarifies a visible choice; repeating a biography in every prompt can make the instructions harder to maintain without resolving the visual ambiguity.
Can I change an outfit after approving the character?
Yes. Keep a base outfit and create named variants, such as everyday and undercover. Define which facial, hair, and prop features survive the change. A new costume should not overwrite the original agreement by accident, especially when both outfits appear in the same episode.
Is text enough to start without a reference image?
Text is a practical way to explore a design. Once a direction is chosen, select a clear master image so future requests have a concrete visual target. A reference still needs inspection: image-conditioned generation can change details and should not be treated as an identity guarantee.
What should I give another creator?
Provide the approved reference, fixed description, allowed variations, version number, and one accepted panel. The character template gives you a reusable handoff structure. Start with one complete character package in Character Studio, then repeat the workflow for supporting roles.